"Run a nozzle check" is the single most common piece of printer troubleshooting advice out there — and yet almost nobody explains what you're actually supposed to see when you do. You print the pattern, look at a grid of colored lines, and are left guessing whether it's fine or not.
A nozzle check is one of the most useful diagnostic tools built into your printer, and reading it correctly takes about ten seconds once you know what each kind of gap or fade actually means. Here's how to run one and, more importantly, how to interpret it.
What a Nozzle Check Actually Tests
Inside your print head are dozens (sometimes hundreds) of microscopic nozzles, each responsible for firing a tiny amount of ink. A nozzle check prints one short line or block per nozzle group, per color. If a nozzle is clear and firing correctly, its line prints solid and unbroken. If it's clogged with dried ink, its line comes out broken, faint, or missing entirely.
In other words: the pattern is a direct, visual map of which individual nozzles are working and which aren't — which is exactly why it's so useful for pinpointing a problem instead of guessing at one.
How to Run a Nozzle Check
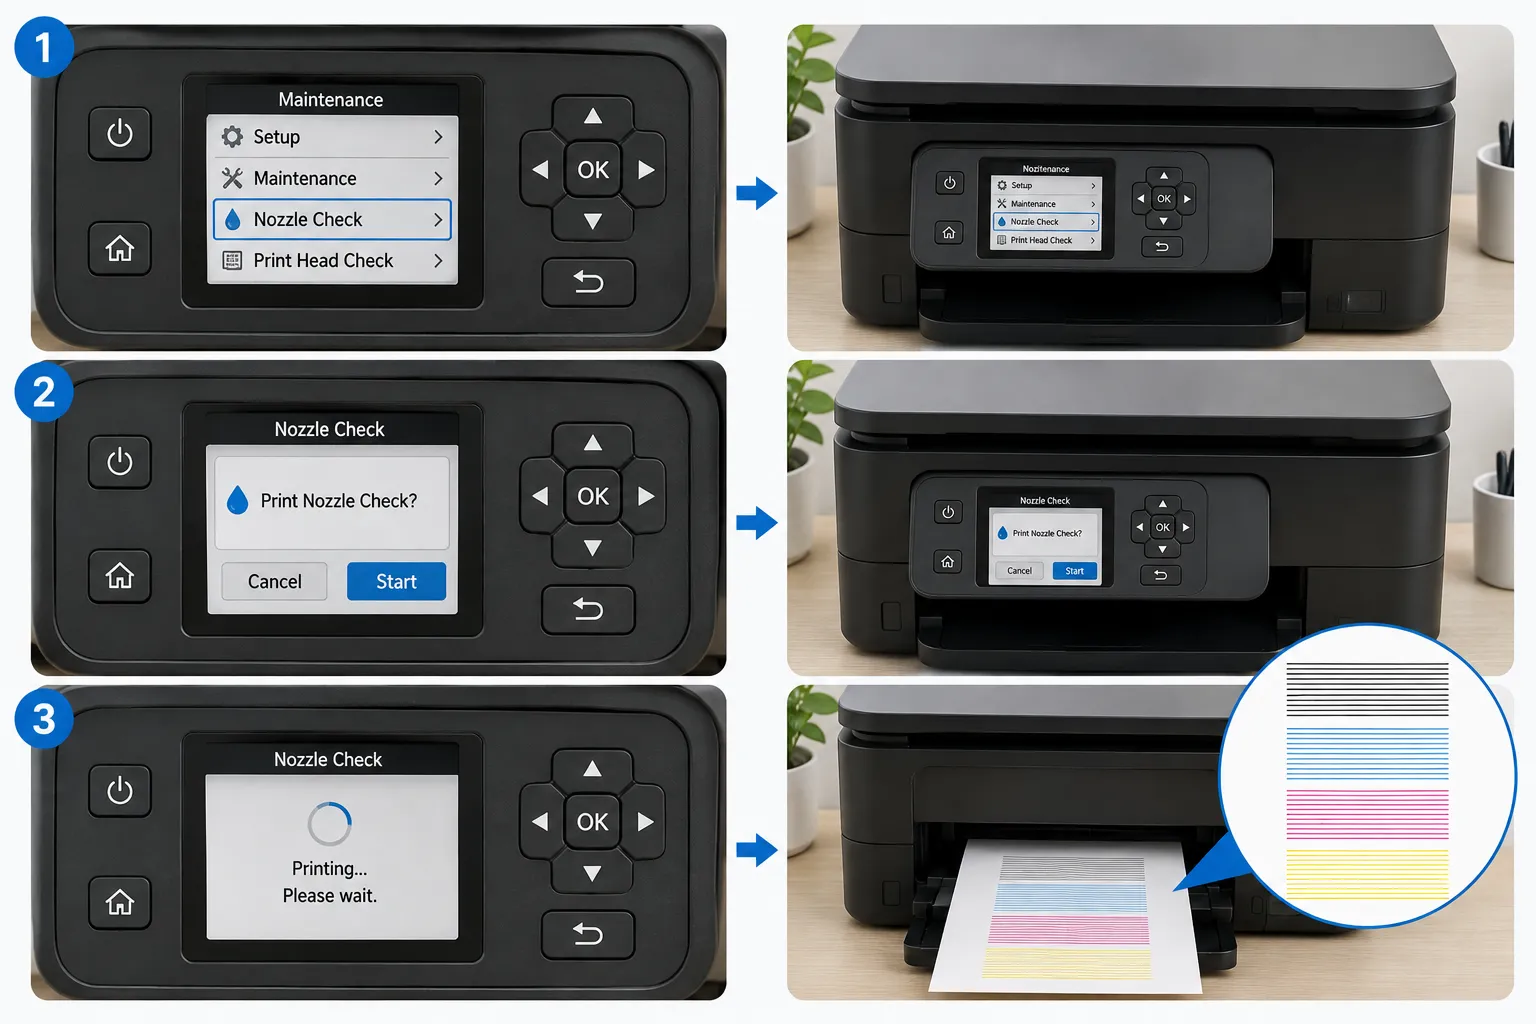
The exact menu wording varies by brand, but the pattern is the same:
- From the printer's control panel — look for Setup, Maintenance, or a wrench/gear icon, then Nozzle Check or Print Head Check
- From desktop software — utilities like HP Print and Scan Doctor, Canon's IJ Printer Utility, or the Epson Printer Utility all include a one-click nozzle check option
Either way, it prints a small test sheet in under a minute, using very little ink.
How to Read the Pattern
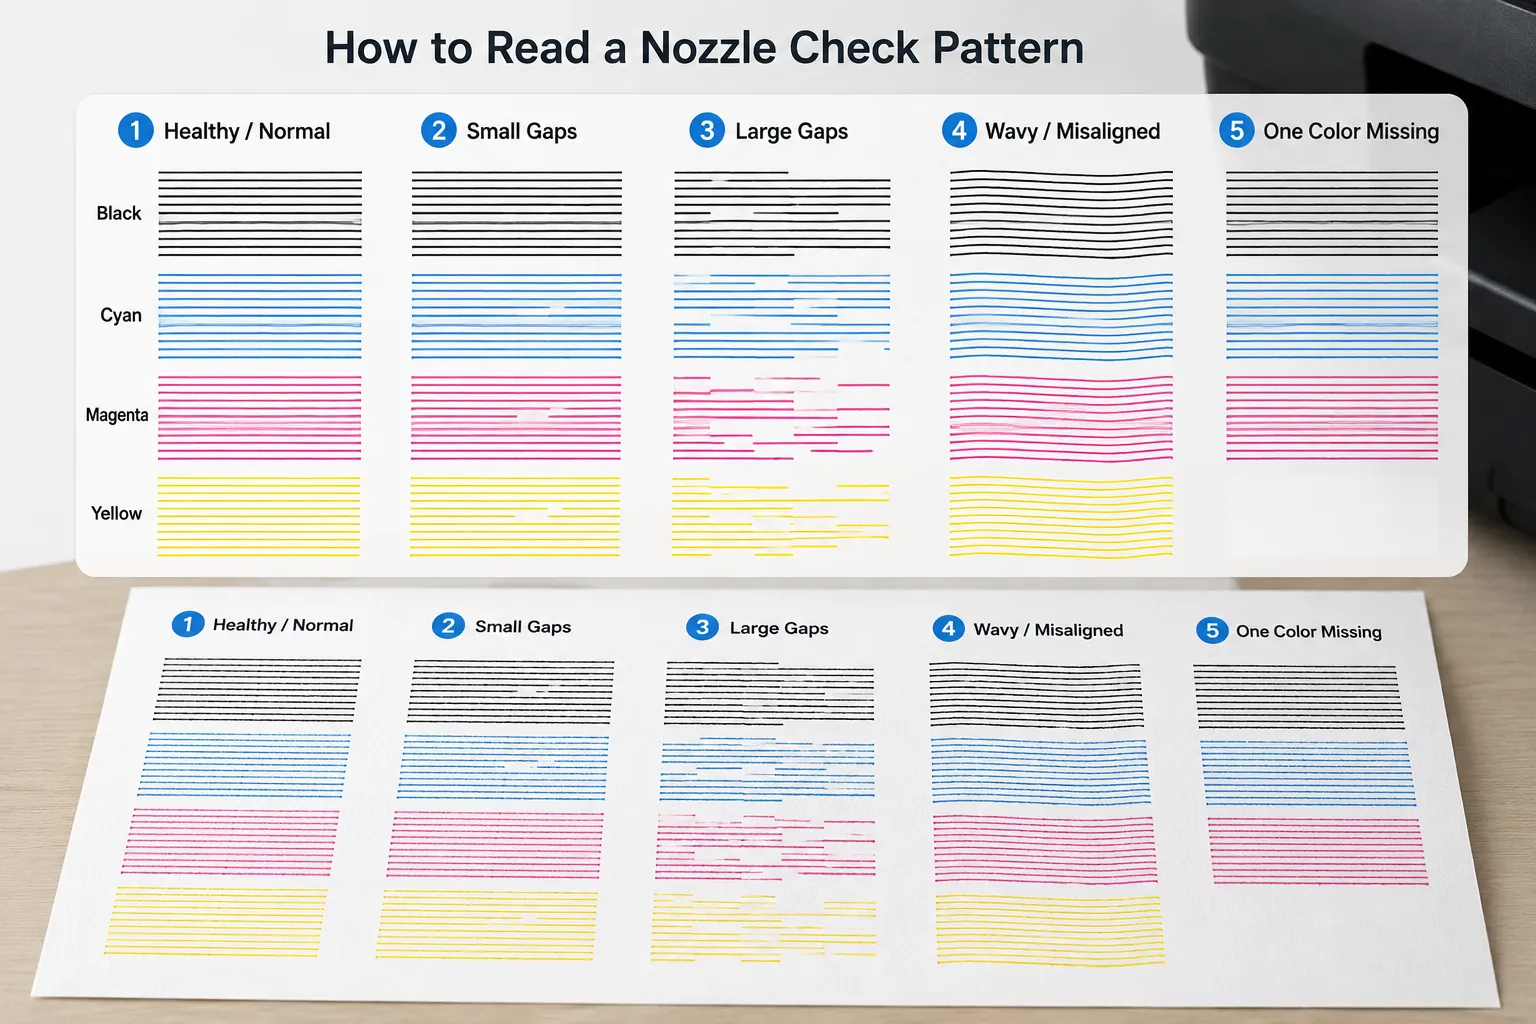
Once it's printed, hold it under good light and check each color individually. Here's what you're looking for:
Solid, unbroken lines in every color
This is what healthy looks like. Every line is continuous with no visible gaps, and every color printed. No action needed — your print head is in good shape.
Small gaps in one or two lines
A few thin white breaks in an otherwise solid line means a handful of nozzles are lightly clogged, usually from a short period of disuse. This is minor and normal, and one standard cleaning cycle from your printer's maintenance menu almost always clears it.
Large gaps, or a color mostly missing
Bigger, more frequent breaks — or a color that's barely visible at all — point to a more significant clog. This usually needs two or three cleaning cycles, run a check between each one, rather than assuming one pass will fix it.
Faint or wavy lines instead of clean gaps
This is a different problem than clogging. If the lines are all present but look uneven, wavy, or slightly doubled rather than broken, that points to print head alignment, not a clog. Cleaning cycles won't fix this — run your printer's alignment tool, then confirm it worked with our printer alignment test page.
One color completely blank while the others look fine
If every other color prints solidly but one is entirely missing, that's rarely a clog — it's much more likely that cartridge is empty, expired, or has failed outright. Check ink levels and try swapping that cartridge before running more cleaning cycles.
| What you see | Likely cause | What to do |
|---|---|---|
| All lines solid | Print head is healthy | Nothing — you're good to print |
| Small gaps, 1–2 colors | Minor clogging | Run one cleaning cycle |
| Large gaps or mostly missing | Significant clogging | Run 2–3 cleaning cycles, checking between each |
| Wavy or uneven, not broken | Print head misalignment | Run the alignment tool, not a cleaning cycle |
| One color totally blank | Empty or failed cartridge | Replace that cartridge |
How Often Should You Run a Nozzle Check?
If you print regularly (a few times a week), you rarely need to think about this — the act of printing keeps ink flowing through the nozzles. It's printers that sit idle for weeks at a time that clog most often, since ink dries inside unused nozzles. As a rough habit, run a nozzle check before any print job you can't afford to get wrong, and any time you haven't printed in a couple of weeks.
Don't run more than two or three cleaning cycles back to back. Each cycle uses ink to force the clog through, and repeated cycles in a row burn through cartridges fast without adding much benefit over spacing them out. If three cycles haven't cleared it, let the printer sit for a few hours before trying again.
Frequently Asked Questions
What does it mean if my nozzle check pattern is completely blank?
A totally blank pattern usually means either the cartridge is empty or not seated properly, rather than a clog. Reseat the cartridge firmly and try again before running a cleaning cycle.
Can a nozzle check pattern look fine but my prints still have streaks?
Yes — if the streaking only shows up on certain paper types or in specific areas of a page, it may be a paper feed or roller issue rather than a nozzle problem. A clean nozzle check pattern does rule out clogging as the cause, though, which narrows things down.
How much ink does running a nozzle check use?
Very little — a nozzle check only prints a small pattern, not a full page of ink. It's designed to be run freely as a diagnostic step without meaningfully affecting your ink supply.
Related Guides
- Printer Color Calibration Guide
- How to Print a Test Page
- Printer Print Quality Problems Explained
- Color Printer Test Page
- Nozzle Check Test Page — print a synthetic nozzle check pattern directly, no printer utility needed
- Printer Alignment Test Page